Lecture 10 — Choice Controls: Radio Buttons & Checkboxes
Lecture 10 — Choice Controls: Radio Buttons & Checkboxes⌗
Instructor: Laksh Budhrani
Quick Recall: Lecture 9 Summary⌗
Last class, we learned how to collect information from website visitors by building interactive HTML forms! Here is a review of all the new tags and attributes we mastered:
| Tag / Attribute | Type | Purpose | Example |
|---|---|---|---|
<form> | Paired Tag | Main wrapper container for all form controls | <form>...</form> |
<label> | Paired Tag | Displays text labeling a specific input field | <label>Name:</label> |
<input> | Unpaired Tag | Creates an interactive input field | <input type="text"> |
type="text" | Attribute Value | Creates a standard single-line text box | <input type="text"> |
type="email" | Attribute Value | Creates an input box tuned for email addresses | <input type="email"> |
type="password" | Attribute Value | Creates a masked text box that hides typed characters | <input type="password"> |
name="..." | Attribute | Column header/label for saving field data in the backend | name="user_name" |
value="..." | Attribute | Text stored or pre-filled inside the input box | value="Peter" |
Class Check-In: Why give choices instead of text boxes? Choice controls make forms faster to fill out and prevent spelling errors!
The Story Continues…⌗

Sahil’s Week 10 Update!
Sahil’s contact form is looking great, but now he wants to organize his study group sign-ups!
He needs to ask his classmates two specific questions on his page
sahil_day10.html:
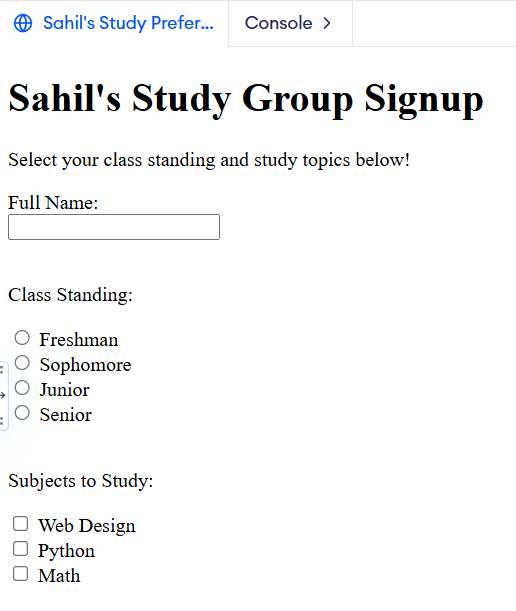
- “What is your current class standing?” (Freshman, Sophomore, Junior, or Senior — Must pick exactly ONE)
- “Which subjects do you want to study together?” (Web Design, Python, Math, Physics — Can pick MULTIPLE)
Let’s help Sahil build these choice options using Radio Buttons and Checkboxes!
Sahil’s Request for Today⌗
“Hey! I want to make my study group form super easy to fill out with quick clickable options!”
“Here is what I need you to help me build in
sahil_day10.html:”
- Single-Choice Group (Radio Buttons): A question where classmates select their grade level. Selecting one should uncheck any other!
- Multi-Choice Group (Checkboxes): A question where classmates can check off all subjects they want to study.
- Proper Grouping (
nameattribute): Group radio buttons together correctly so only one can be picked at a time!
Objectives⌗
- Master single-choice selection using
<input type="radio">. - Group radio buttons using matching
nameattributes. - Master multi-choice selection using
<input type="checkbox">. - Use pre-defined
valueattributes so the computer knows which option was clicked.
Objective 1 & 2 — Radio Buttons (type="radio")⌗
Radio buttons are used when a user must choose exactly one option out of a list.
Grouping with name⌗
To make radio buttons work as a team, all radio buttons in the same question MUST share the exact same name attribute!
<label>Grade Level:</label><br>

<input type="radio" name="grade" value="freshman">
<label>Freshman</label><br>

<input type="radio" name="grade" value="sophomore">
<label>Sophomore</label>
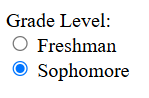
Important Rule: If radio buttons have different
nameattributes, the browser will let you select all of them at once!
Objective 3 — Checkboxes (type="checkbox")⌗
Checkboxes are used when a user can select zero, one, or multiple options. Checking one box does NOT uncheck the others!
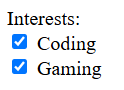
<label>Interests:</label><br>

<input type="checkbox" name="interest" value="coding">
<label>Coding</label><br>

<input type="checkbox" name="interest" value="gaming">
<label>Gaming</label>
Objective 4 — Why value is Mandatory for Choice Controls!⌗
When users type into a text box, the computer saves whatever text they typed.
With radio buttons and checkboxes, users don’t type anything—they just click a button!
Because of this, you must write value="..." in your HTML so the computer knows what text to save when an option is clicked.
<input type="radio" name="grade" value="Freshman">
grade (from name) |
|---|
| Freshman (value saved when clicked) |
Guided Activity — Building Sahil’s Choice Form⌗
PART 1 — Project Setup⌗
- Open VS Code.
- Go to File → Open Folder and select your
Sahil_Projectfolder. - Create a new file named:
sahil_day10.html.
PART 2 — Expected Browser Output⌗
Here is what Sahil’s completed choice form will look like once we write the HTML together:
PART 3 — Starter Code (We will write the content together live!)⌗
Paste this starter boilerplate into sahil_day10.html. We will fill in the <body> together in class!
<!DOCTYPE html>
<html>

<head>
    <title>Sahil's Study Preferences</title>
</head>

<body>
	<!-- START WRITING HERE -->


	<!-- STOP WRITING HERE -->
</body>

</html>
Independent Activity — Portfolio Survey Page!⌗
Now it’s your turn! Add a quick feedback or survey section to your portfolio site using choice controls.
Instructions:⌗
- Open your
Portfoliofolder in VS Code. - Create a new file named
portfolio_day10.html. - Copy the starter template above into your file and build your page using
<form>, radio buttons, and checkboxes.
Your Portfolio Prompt⌗
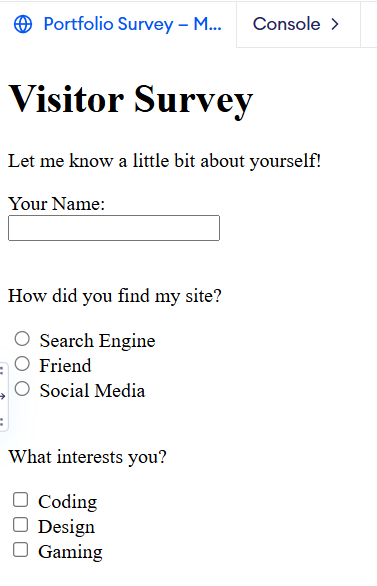
Your page must include the following 4 requirements:
- Form Setup: Set up 1 main
<form>container with a descriptive<h1>title above it. - Text Field: Include at least 1 text input (Name or Email).
- Radio Button Group (Pick 1): Create a group of at least 3 radio buttons with matching
nameattributes and clearvalueattributes. - Checkbox Group (Pick Multiple): Create a group of at least 3 checkboxes with clear
valueattributes.
Example Solution⌗
Submission Instructions⌗
Submit your work in Google Classroom under In‑Class Exercise 10 by:
- Opening your Google Doc from previous lectures.
- Pasting your HTML code from both
sahil_day10.htmlandportfolio_day10.html. - Adding screenshots of both rendered pages from your browser.
- Turning in the document!
Summary: New Tags & Attributes Learned Today⌗
| Control / Attribute | Type | Purpose | Code Example |
|---|---|---|---|
type="radio" | Attribute Value | Single-choice round button | <input type="radio"> |
type="checkbox" | Attribute Value | Multi-choice square box | <input type="checkbox"> |
name="..." | Attribute | Groups radio buttons together & labels column | name="grade" |
value="..." | Attribute | Sets the specific data text saved when clicked | value="freshman" |