Lecture 11 — Dropdown Menus & Multi-Line Text Inputs
Lecture 11 — Dropdown Menus & Multi-Line Text Inputs⌗
Instructor: Laksh Budhrani
Quick Recall: HTML Form Tags & Attributes Covered So Far⌗
Up until now, we have learned how to collect text, passwords, emails, and single/multiple choices using form controls! Here is the complete list of form tags and attributes we have mastered so far:
| Tag / Attribute | Type | Purpose | Example |
|---|---|---|---|
<form> | Paired Tag | Main wrapper container for all form controls | <form>...</form> |
<label> | Paired Tag | Displays text labeling a specific input field | <label>Name:</label> |
<input> | Unpaired Tag | Creates an interactive input field | <input type="text"> |
type="text" | Attribute Value | Creates a standard single-line text box | <input type="text"> |
type="email" | Attribute Value | Creates an input box tuned for email addresses | <input type="email"> |
type="password" | Attribute Value | Creates a masked text box that hides typed characters | <input type="password"> |
type="radio" | Attribute Value | Creates a single-choice round button | <input type="radio"> |
type="checkbox" | Attribute Value | Creates a multi-choice square box | <input type="checkbox"> |
name="..." | Attribute | Column header/label for saving field data in the backend | name="user_name" |
value="..." | Attribute | Text stored or pre-filled inside the input box / choice | value="Peter" |
Class Check-In: Radio buttons are great for short lists (2–4 items), but what if we have a list of 50 states or 20 majors? Placing 50 radio buttons takes up too much room! Today, we learn how to save screen space and collect long text.
The Story Continues…⌗

Sahil’s Week 11 Update!
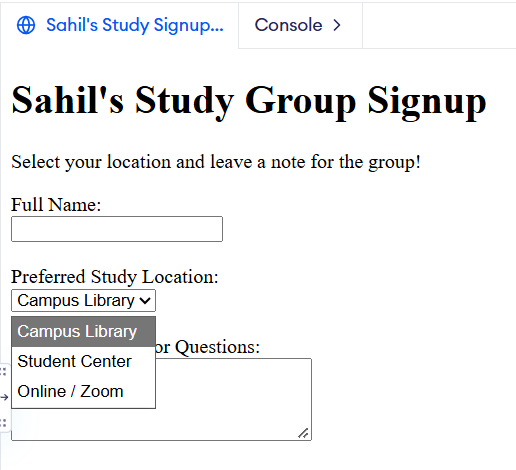
Sahil’s study group form is coming together nicely! Now he wants to add two final sections on his page
sahil_day11.html:
- “Select Your Academic Campus / Major” (A clean list where users pick one item without cluttering the screen).
- “Leave a Custom Message or Study Notes” (A large box where classmates can type long multi-line paragraphs).
Let’s help Sahil finish his study form using Dropdown Menus (
<select>) and Text Areas (<textarea>)!
Sahil’s Request for Today⌗
“Hey! I want my form to stay neat and clean while letting visitors pick from long lists and write full messages!”
“Here is what I need you to help me build in
sahil_day11.html:”
- Compact Dropdown List: A dropdown menu using
<select>and<option>tags so visitors can choose their preferred study location.- Multi-Line Message Box: A larger box using
<textarea>where visitors can type custom messages or study notes.- Clean Layout: Use proper labels so visitors know exactly what each box is for!
Objectives⌗
- Understand how to build a compact dropdown menu using
<select>and<option>. - Learn how to set the data value for dropdown items using the
valueattribute. - Master multi-line text collection using the
<textarea>tag. - Customize text areas using
rowsandcolsattributes.
Objective 1 & 2 — Dropdown Menus (<select> & <option>)⌗
When you have many options, a dropdown menu saves screen space by hiding choices until clicked.
How it Works:⌗
<select>(Paired Tag): Creates the main wrapper and holds thenameattribute.<option>(Paired Tag): Defines each choice inside the dropdown list and holds thevalueattribute.
<label>Select Study Location:</label><br>

<select name="location">
    <option value="library">Campus Library</option>
    <option value="student_center">Student Center</option>
    <option value="online">Online / Zoom</option>
</select>
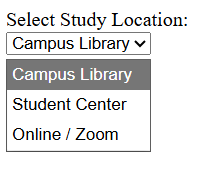
Important Rule: The
nameattribute goes inside the outer<select>tag, while thevalueattributes go inside each inner<option>tag!
Objective 3 & 4 — Multi-Line Text (<textarea>)⌗
Standard <input type="text"> fields only allow one single line of text. When you need visitors to write long comments, feedback, or messages, use <textarea>.
Key Differences:⌗
<textarea>is a paired tag (unlike<input>, which is unpaired!).- You can control the initial size using
rows(height in lines) andcols(width in characters).
<label>Your Message:</label><br>

<textarea name="user_message" rows="4" cols="30"></textarea>
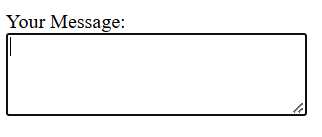
Pro Tip: Anything written between
<textarea>and</textarea>becomes pre-filled default text! Keep them right next to each other to start with a clean, empty box.
Guided Activity — Building Sahil’s Form Controls⌗
PART 1 — Project Setup⌗
- Open VS Code.
- Go to File → Open Folder and select your
Sahil_Projectfolder. - Create a new file named:
sahil_day11.html.
PART 2 — Expected Browser Output⌗
Here is what Sahil’s completed dropdown and message form will look like once we write the HTML together:
PART 3 — Starter Code (We will write the content together live!)⌗
Paste this starter boilerplate into sahil_day11.html. We will fill in the <body> together in class!
<!DOCTYPE html>
<html>

<head>
    <title>Sahil's Study Signup & Messages</title>
</head>

<body>
	<!-- START WRITING HERE -->


	<!-- STOP WRITING HERE -->
</body>

</html>
Independent Activity — Portfolio Feedback Page!⌗
Now it’s your turn! Add a feedback or comment section to your portfolio site using dropdown menus and multi-line text areas.
Instructions:⌗
- Open your
Portfoliofolder in VS Code. - Create a new file named
portfolio_day11.html. - Copy the starter template above into your file and build your page using
<form>,<select>, and<textarea>.
Your Portfolio Prompt⌗
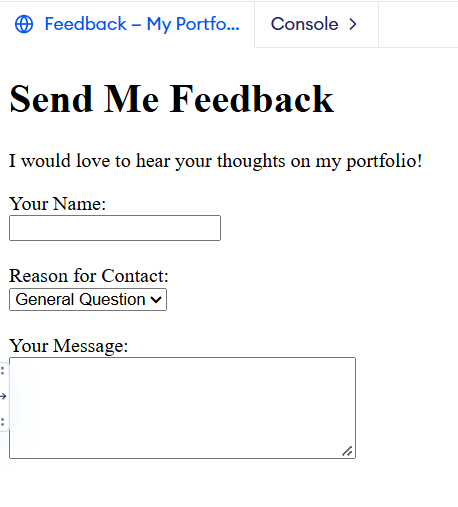
Your page must include the following 4 requirements:
- Form Setup: Set up 1 main
<form>container with a descriptive<h1>title above it. - Text Field: Include at least 1 text input for the user’s name or email.
- Dropdown Menu (
<select>): Create a dropdown list with at least 3<option>choices using propernameandvalueattributes (e.g., “Select Reason for Contact”). - Multi-Line Text Area (
<textarea>): Create a message box usingrowsandcolsso visitors can leave a custom comment or feedback message.
Example Solution⌗
Submission Instructions⌗
Submit your work in Google Classroom under In‑Class Exercise 11 by:
- Opening your Google Doc from previous lectures.
- Pasting your HTML code from both
sahil_day11.htmlandportfolio_day11.html. - Adding screenshots of both rendered pages from your browser.
- Turning in the document!
Objective Summary: Dropdown vs. Textarea⌗
| Control / Tag | Type | Purpose | Code Example |
|---|---|---|---|
<select> | Paired Tag | Main wrapper container for a dropdown menu | <select name="location"> |
<option> | Paired Tag | Single item/choice inside a dropdown list | <option value="online">Online</option> |
<textarea> | Paired Tag | Creates a multi-line text input box | <textarea name="msg"></textarea> |
rows="..." | Attribute | Sets the height of a text area in lines | rows="4" |
cols="..." | Attribute | Sets the width of a text area in characters | cols="30" |