Lecture 12 — Buttons & Form Submission
Lecture 12 — Specialized Input Types: Date, Time, Color & File⌗
Instructor: Laksh Budhrani
Quick Recall: Lectures 9–11 Review⌗
Before we learn about specialized form controls, let’s review all the tags and attributes we’ve mastered so far in our forms unit!
| Tag / Attribute | Type | Purpose | Example |
|---|---|---|---|
<form> | Paired Tag | Main wrapper container for all form controls | <form>...</form> |
<label> | Paired Tag | Displays text labeling a specific input field | <label>Name:</label> |
<input> | Unpaired Tag | Creates an interactive input field | <input type="text"> |
type="text" | Attribute Value | Creates a standard single-line text box | <input type="text"> |
type="email" | Attribute Value | Creates an input box tuned for email addresses | <input type="email"> |
type="password" | Attribute Value | Creates a masked text box that hides typed characters | <input type="password"> |
type="radio" | Attribute Value | Single-choice round button | <input type="radio"> |
type="checkbox" | Attribute Value | Multi-choice square box | <input type="checkbox"> |
name="..." | Attribute | Groups controls & labels column header for saved data | name="user_name" |
value="..." | Attribute | Text stored or pre-filled inside the control | value="Freshman" |
<select> | Paired Tag | Main wrapper container for a dropdown menu | <select name="city"> |
<option> | Paired Tag | Defines a single selectable choice inside a dropdown | <option value="sc">SC</option> |
<textarea> | Paired Tag | Creates a multi-line text input box for long text | <textarea name="bio"></textarea> |
rows="..." | Attribute | Sets the height of a text area in lines | rows="4" |
cols="..." | Attribute | Sets the width of a text area in characters | cols="30" |
Class Check-In: Does anyone have questions about text inputs, choice controls, dropdowns, or textareas before we learn about specialized form controls?
The Story Continues…⌗
Sahil’s Week 12 Update!
Sahil is adding key features to his study group portal on
sahil_day12.html:
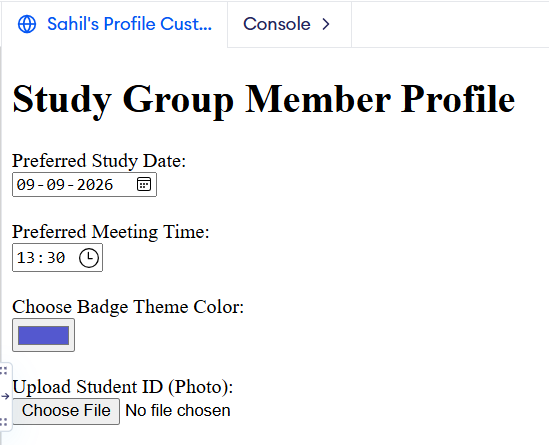
- Classmates need to select the date they want to study together and their preferred study session time.
- Classmates should pick a theme color for their profile card.
- Classmates need to upload a student ID or profile photo.
Typing dates or hex codes manually into text boxes leads to bad formatting. Let’s help Sahil use HTML5 specialized input types (
date,time,color, andfile)!
Sahil’s Request for Today⌗
“Hey! I want my study group portal to feature calendar popups, color wheels, and upload buttons instead of plain text fields!”
“Here is what I need you to help me build in
sahil_day12.html:”
- Date & Time Pickers: Standardized inputs for picking study session dates and start times.
- Color Palette Picker: A visual box to select custom theme colors.
- File Upload Field: A file selector button to upload images or documents.
Objectives⌗
- Create date selection controls using
<input type="date">. - Create time selection controls using
<input type="time">. - Integrate visual color pickers using
<input type="color">. - Allow file attachments using
<input type="file">.
Objective 1 & 2 — Date & Time Pickers (type="date", type="time")⌗
Date and time inputs provide built-in visual clock and calendar widgets across desktop and mobile browsers.
<label>Select Date:</label><br>
<input type="date" name="event_date">
<br><br>

<label>Select Time:</label><br>
<input type="time" name="event_time">
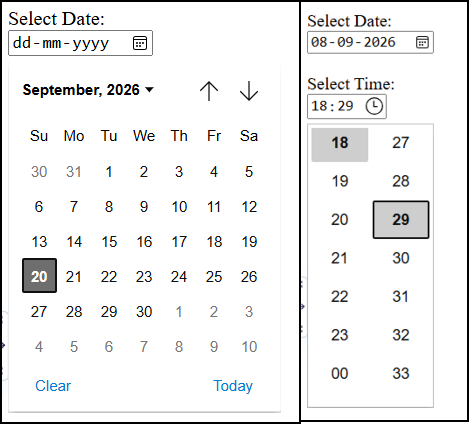
Important Rule: Browsers handle date and time formatting automatically based on the user’s localized system settings!
Objective 3 — Color Picker (type="color")⌗
The color input type opens a native color wheel/palette interface. The selected color is stored as a 6-digit hex value (e.g., #3b82f6).
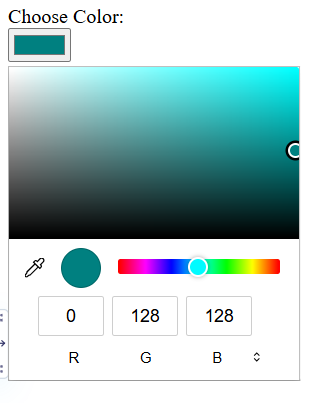
<label>Choose Color:</label><br>
<input type="color" name="accent_color" value="#008080">
Objective 4 — File Upload (type="file")⌗
The file input type renders a browser-native “Choose File” or “Browse” button that opens the device file manager.
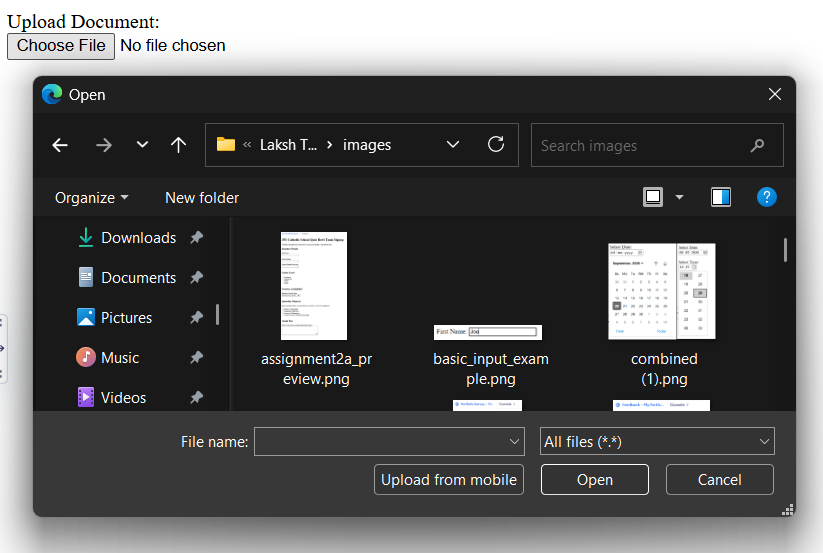
<label>Upload Document:</label><br>
<input type="file" name="attachment">
Guided Activity — Building Sahil’s Specialized Form⌗
PART 1 — Project Setup⌗
- Open VS Code.
- Go to File → Open Folder and select your
Sahil_Projectfolder. - Create a new file named:
sahil_day12.html.
PART 2 — Expected Browser Output⌗
Here is what Sahil’s completed form will look like once we write the HTML together:
PART 3 — Starter Code (We will write the content together live!)⌗
Paste this starter boilerplate into sahil_day12.html. We will fill in the <body> together in class!
<!DOCTYPE html>
<html>

<head>
    <title>Sahil's Profile Customization</title>
</head>

<body>
	<!-- START WRITING HERE -->


	<!-- STOP WRITING HERE -->
</body>

</html>
Independent Activity — Portfolio Event & Profile Page!⌗
Now it’s your turn! Add an event scheduler or custom profile setup section to your portfolio site using specialized input types.
Instructions:⌗
- Open your
Portfoliofolder in VS Code. - Create a new file named
portfolio_day12.html. - Copy the starter template above into your file and build your page using
<form>and specialized inputs.
Your Portfolio Prompt⌗
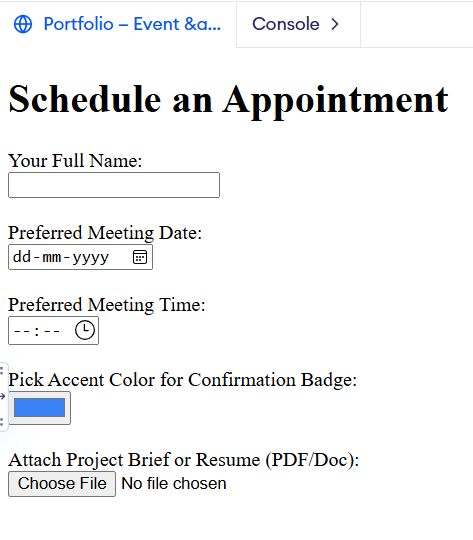
Your page must include the following 4 requirements:
- Form Setup: Set up 1 main
<form>container with a descriptive<h1>title above it. - Date & Time Inputs: Include at least 1 date input and 1 time input with clear labels.
- Color Picker: Include at least 1 color input for picking a visual accent color.
- File Upload: Include at least 1 file input to upload an avatar or document.
Example Solution⌗
Submission Instructions⌗
Submit your work in Google Classroom under In‑Class Exercise 12 by:
- Opening your Google Doc from previous lectures.
- Pasting your HTML code from both
sahil_day12.htmlandportfolio_day12.html. - Adding screenshots of both rendered pages from your browser.
- Turning in the document!
Summary: New Tags & Attributes Learned Today⌗
| Control / Attribute | Type | Purpose | Code Example |
|---|---|---|---|
type="date" | Attribute Value | Calendar date selector | <input type="date"> |
type="time" | Attribute Value | Clock time selector | <input type="time"> |
type="color" | Attribute Value | Native visual color palette picker | <input type="color"> |
type="file" | Attribute Value | File upload selector button | <input type="file"> |