Lecture 3 — Unpaired Tags & HTML Comments
Lecture 3 — Unpaired Tags & HTML Comments⌗
Instructor: Laksh Budhrani
Quick Recall: Lecture 1 & 2 Review⌗
Before we jump into today’s mission, let’s review all the tags we’ve added to our toolkit so far!
| Tag | Name | What It Does | Example |
|---|---|---|---|
<h1> – <h6> | Headings | Creates headings of different sizes | <h1>Heading</h1> |
<p> | Paragraph | Groups text into structured blocks | <p>Text here...</p> |
<b> | Bold | Emphasizes text in bold | <b>Important</b> |
<i> | Italics | Slants text in italics | <i>Stylized note</i> |
<u> | Underline | Underlines text for emphasis | <u>Underlined</u> |
<mark> | Highlight | Adds yellow highlight behind text | <mark>Highlighted</mark> |
<sup> | Superscript | Raises text slightly above line | 1<sup>st</sup> |
<sub> | Subscript | Lowers text slightly below line | H<sub>2</sub>O |
<s> | Strikethrough | Crosses out text with a line | <s>Completed</s> |
Class Check-In: Does anyone have any questions or doubts about these 9 tags before we learn about unpaired tags?
The Story Continues…⌗

Sahil’s Week 3 Update!
Sahil’s website is coming along nicely, but as he adds more information, his page is starting to look crowded! Everything is clumping together, and it’s hard to tell where one section ends and another begins.
Plus, he wants to add a brand-new “Campus Location & Schedule” section to his existing page to list his dorm building, classroom location, and class times. He needs your help using unpaired tags to separate his page into clean sections, group multi-line information neatly, and organize his code with hidden notes!
Sahil’s Request for Today⌗
“Hey! Thanks for helping me build my notebook page last time. Today, I want to expand my existing
sahil_day2.htmlpage with new information and organize it so it’s super clean and easy to read.”“Here is what I need you to help me do:”
- Code Notes (Comments): Add hidden notes in the HTML code to label where my “Academic Goals”, “Current Status & Stats”, and “Checklist” sections start so I can find them easily.
- Section Dividers: Place horizontal divider lines between each major section so the page looks neat.
- New Campus Info Section: Type a brand-new section showing my Dorm Building and Class Room, using tight line breaks so the address and class times sit right under each other without huge gaps!
Objectives⌗
- Understand the difference between Paired vs. Unpaired tags
- Learn how to add hidden notes in your code using HTML Comments (
<!-- -->) - Learn how to draw horizontal divider lines (
<hr>) - Learn how to force line breaks without creating new paragraphs (
<br>)
Objective 1 — Paired vs. Unpaired Tags⌗
HTML tags are divided into two main categories based on how they are written:
                        ┌──────────────────┐
                        │    HTML TAGS     │
                        └────────┬─────────┘
                                 │
           ┌─────────────────────┴─────────────────────┐
           ▼                                           ▼
┌──────────────────────┐                   ┌──────────────────────┐
│     PAIRED TAGS      │                   │    UNPAIRED TAGS     │
│ <tag>content</tag>   │                   │        <tag>         │
└──────────────────────┘                   └──────────────────────┘
1. Paired Tags (Container Tags)⌗
- Syntax:
<tagname> Content goes here </tagname> - Description: Paired tags come in pairs (an opening tag and a closing tag with a
/). They wrap around text or other elements to apply formatting. - Examples:
<p>,<h1>,<b>,<i>,<u>,<mark>,<sup>,<sub>,<s>
2. Unpaired Tags (Self-Closing / Standalone Tags)⌗
- Syntax:
<tagname> - Description: Unpaired tags stand completely alone. They do not have a closing tag and do not wrap around content. Instead, they directly perform an action or insert a visual element on the page.
- Examples:
<hr>,<br>
Objective 2 — HTML Comments (<!-- -->)⌗
Simple Definition⌗
HTML Comments are hidden notes written in your code. The browser completely ignores them, making them perfect for leaving notes for yourself or labeling sections of your project.
Example⌗
<!-- This is a hidden note for the programmer -->
<h2>About Me</h2>

Objective 3 — Horizontal Rule (<hr>)⌗
Simple Definition⌗
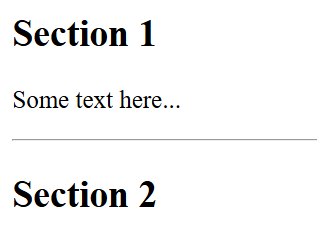
The <hr> tag draws a horizontal divider line across the page to visually separate different sections.
Example⌗
<h2>Section 1</h2>
<p>Some text here...</p>
<hr>
<h2>Section 2</h2>
Objective 4 — Line Break (<br>)⌗
Simple Definition⌗
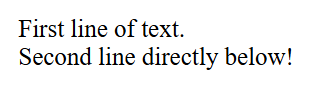
The <br> tag forces text down to the very next line immediately, without adding the large spacing gap that a <p> tag creates.
Example⌗
<p>
    First line of text.<br>
    Second line directly below!
</p>
Guided Activity — Expand & Organize Sahil’s Page⌗
PART 1 — Project Setup⌗
- Open VS Code.
- Go to File → Open Folder and select your
Sahil_Projectfolder. - Open your existing file:
sahil_day2.html. - We will expand and upgrade this existing page together live in class!
PART 2 — Expected Browser Output⌗
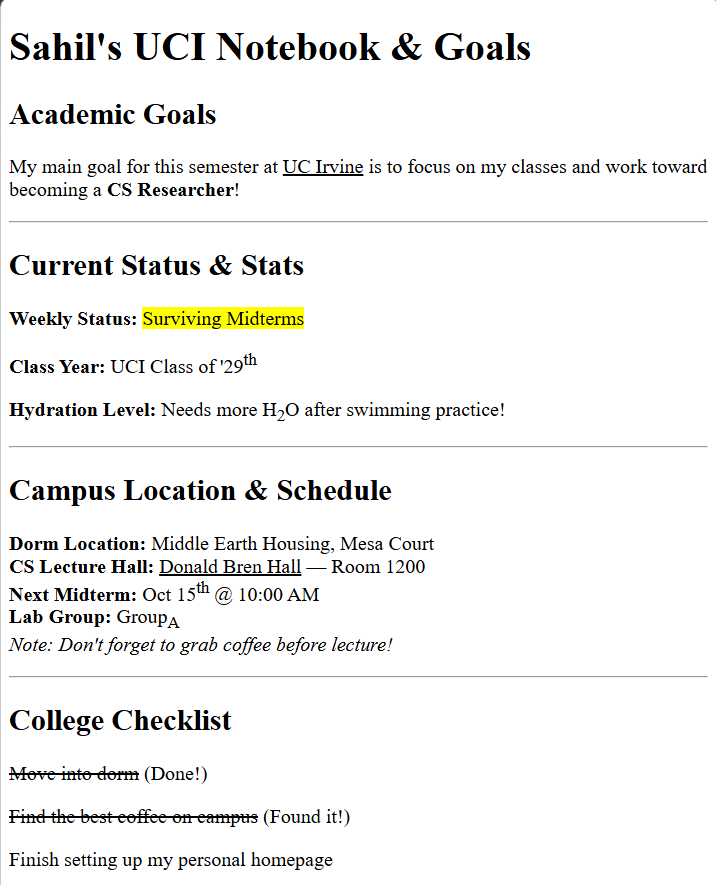
Here is what Sahil’s updated website will look like once we add the new campus location section, comments, line breaks, and horizontal rules together:
PART 3 — Live Coding Challenge⌗
We will take our existing code in sahil_day2.html and upgrade it together by inserting comments, adding <hr> dividers between sections, and typing out the new Campus Location & Schedule section using <br> line breaks!
Independent Activity — Favorite Favorites & Layout Clean-Up!⌗
Now it’s your turn! Open your existing personal portfolio page, add a brand-new Top 3 Favorites section, and organize your page using unpaired tags.
Instructions:⌗
- Open your
Portfoliofolder in VS Code. - Open your existing file:
portfolio_day2.html. - Add the new favorites section and upgrade your page directly inside this file!
Your Portfolio Prompt⌗
Your updated page must include the following 4 simple requirements:
- Section Comments (
<!-- -->): Add at least 3 HTML comments to label your code sections (e.g.,<!-- Favorites Section -->). - Horizontal Dividers (
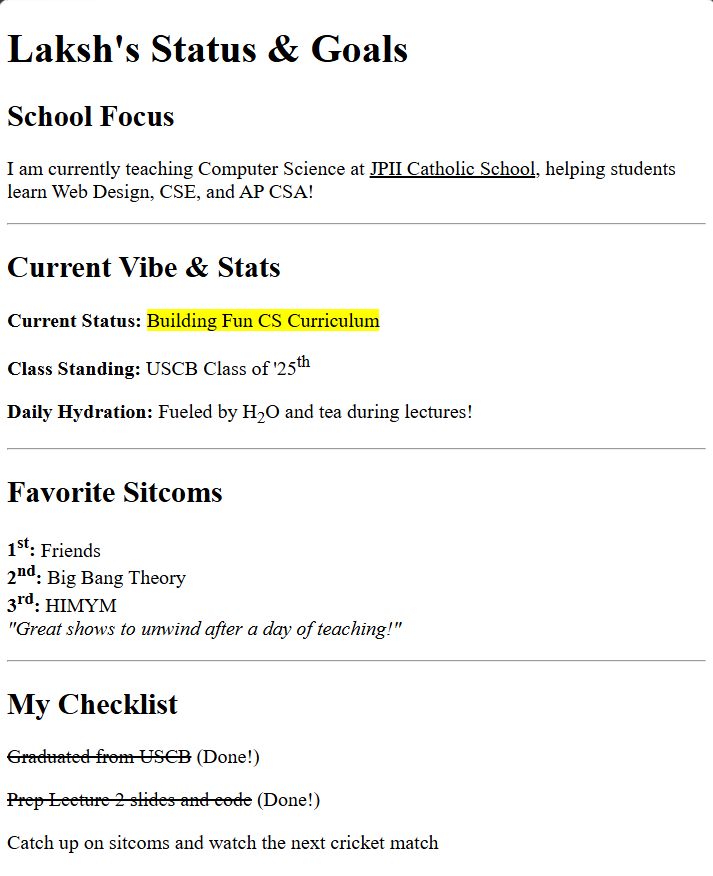
<hr>): Add at least 2 horizontal divider lines (<hr>) to separate your main sections visually. - NEW Section — Top 3 Favorites: Add a new
<h2>section listing your top 3 favorite series, movies, video games, or songs. Use<br>to put each item on its own line! - Tag Review: Format your top 3 rank numbers using
<sup>or<sub>(e.g.,1<sup>st</sup>: Friends), and use 2 other formatting tags of your choice (<u>,<mark>,<b>,<i>, or<s>) in your new section.
Example Solution⌗
Submission Instructions⌗
Submit your work in Google Classroom under In‑Class Exercise 3 by:
- Opening your Google Doc from previous lectures.
- Pasting your updated HTML code from both
sahil_day2.htmlandportfolio_day2.html. - Adding screenshots of both rendered pages from your browser.
- Turning in the document!
Summary: New Tags Learned Today⌗
| Tag | Name | Type | What It Does | Example |
|---|---|---|---|---|
<!-- --> | Comment | Unpaired (Special) | Leaves hidden notes in code | <!-- Note here --> |
<hr> | Horizontal Rule | Unpaired | Draws a horizontal line across page | <hr> |
<br> | Line Break | Unpaired | Forces text to start on next line | <br> |