Lecture 4 — HTML Attributes: Images & Links
Lecture 4 — HTML Attributes: Images & Links⌗
Instructor: Laksh Budhrani
Quick Recall: Lectures 1–3 Review⌗
Before we learn how to give our tags custom instructions, let’s review all 12 tags we’ve learned so far!
| Tag | Name | Type | What It Does | Example |
|---|---|---|---|---|
<h1> – <h6> | Headings | Paired | Creates headings of different sizes | <h1>Heading</h1> |
<p> | Paragraph | Paired | Groups text into structured blocks | <p>Text here...</p> |
<b> | Bold | Paired | Emphasizes text in bold | <b>Important</b> |
<i> | Italics | Paired | Slants text in italics | <i>Stylized note</i> |
<u> | Underline | Paired | Underlines text for emphasis | <u>Underlined</u> |
<mark> | Highlight | Paired | Adds yellow highlight behind text | <mark>Highlighted</mark> |
<sup> | Superscript | Paired | Raises text slightly above line | 1<sup>st</sup> |
<sub> | Subscript | Paired | Lowers text slightly below line | H<sub>2</sub>O |
<s> | Strikethrough | Paired | Crosses out text with a line | <s>Completed</s> |
<!-- --> | Comment | Special | Leaves hidden notes in code | <!-- Note here --> |
<hr> | Horizontal Rule | Unpaired | Draws a horizontal divider line | <hr> |
<br> | Line Break | Unpaired | Forces text down to the next line | <br> |
Class Check-In: Does anyone have questions about any of these 12 tags before we move forward?
The Story Continues…⌗

Sahil’s Week 4 Update!
Sahil’s notebook page is clean and organized thanks to
<hr>and<br>, but now he wants to bring it to life!He wants to add a photo of himself so people know whose page it is, and a clickable link to his university website (UC Irvine) so visitors can check out his campus. But just typing
<img>or<a>doesn’t tell the browser which picture to show or where the link should go! Sahil needs our help learning about Attributes to give his tags specific instructions insideindex.html.
Sahil’s Request for Today⌗
“Hey! My notebook looks super neat now, but it’s pure text! Today, I want to make it interactive inside my main
index.htmlfile.”“Here is what I need you to help me do:”
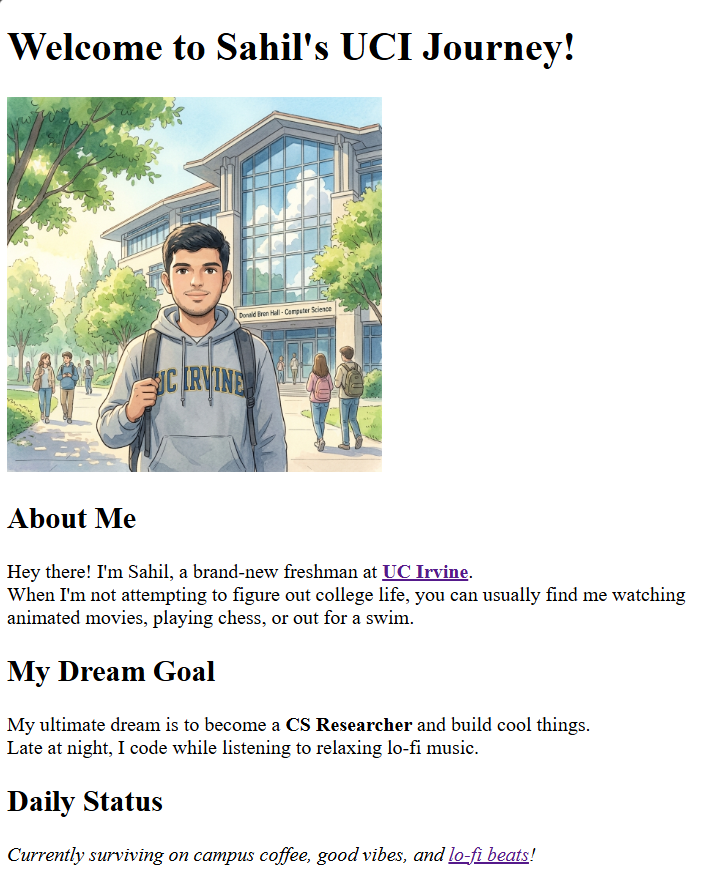
- Add Profile & Campus Photos: Display my profile image and a picture of UCI using
<img>, setting their dimensions so they fit nicely on the page.- Add Helpful Links: Create a clickable link taking visitors to the official UC Irvine website using
<a>.- Control Link Destinations: Choose whether links open in a new tab or stay in the same tab using
target.
Objectives⌗
- Understand what HTML Attributes are using real-world analogies
- Master the
<img>tag and its key attributes (src,alt,width,height) - Master the
<a>(Anchor) tag and its key attributes (href,target)
Objective 1 — What are HTML Attributes?⌗
The Real-World Analogy⌗
Think of an HTML tag as a Video Game Character or a Car:
- The Tag tells the browser what kind of object to create (e.g.,
CarorPlayer). - The Attributes are the custom details or settings that customize that object (e.g.,
color="red",speed="100mph",outfit="hoodie").
  ┌──────────────────────────────────────────────────────────────┐
  │                        TAG vs ATTRIBUTE                      │
  ├──────────────────────────────────────────────────────────────┤
  │  TAG:       <car>                 (Creates a basic car)      │
  │  ATTRIBUTE: <car color="blue">    (Tells it WHICH color!)    │
  └──────────────────────────────────────────────────────────────┘
Simple Definition⌗
An attribute provides extra information or instructions to an HTML tag. Attributes are always placed inside the opening tag and follow a name="value" structure.
Objective 2 — Displaying Images (<img>)⌗
The <img> tag is an unpaired tag used to display images on a webpage. However, <img> by itself does nothing—it needs attributes to tell the browser what image to show and how big it should be!
<img src="/images/dog.jpg" alt="A cute golden retriever" width="250" height="200">
Essential Image Attributes:⌗
| Attribute | Full Name | Purpose | Generic Example |
|---|---|---|---|
src | Source | Specifies where the image file is saved | src="my_photo.jpg" |
alt | Alternate Text | Text shown if the image breaks, or read by screen readers | alt="Picture of a cat" |
width | Width | Sets the width of the image in pixels | width="300" |
height | Height | Sets the height of the image in pixels | height="200" |
Step-by-Step Attribute Code Playground⌗
Step 1: Basic Source Only (src)⌗
<img src="cat.jpg">

Step 2: Adding Alternate Text (alt)⌗
<img src="cat.jpg" alt="A fluffy orange cat">

Step 3: Setting Custom Width (width)⌗
<img src="cat.jpg" alt="A fluffy orange cat" width="200">
Step 4: Setting Custom Height (height)⌗
<img src="cat.jpg" alt="A fluffy orange cat" height="100">
Step 5: Forcing Both Width AND Height (width + height)⌗
<img src="cat.jpg" alt="A fluffy orange cat" width="300" height="100">
Objective 3 — Clickable Hyperlinks (<a>)⌗
The <a> tag (short for Anchor) creates a clickable link that sends visitors to another webpage.
<a href="https://www.wikipedia.org" target="_blank">Search Wikipedia</a>
Essential Anchor Attributes:⌗
| Attribute | Full Name | Purpose | Options / Values |
|---|---|---|---|
href | Hypertext Reference | Web address (URL) destination | href="[https://example.com](https://example.com)" |
target | Target Window | Controls where the link opens | _blank OR _self |
Where Does the Link Open? (target)⌗
target="_blank"➜ Opens the webpage in a brand-new tab (Keeps your website open in the original tab!).target="_self"➜ Opens the webpage in the same tab (Replaces your webpage with the new site!).
Target Attribute Live Comparison⌗
<!-- Opens in a NEW tab -->
<a href="https://www.google.com" target="_blank">Search Google (New Tab)</a>

<!-- Opens in the SAME tab -->
<a href="https://www.google.com" target="_self">Search Google (Same Tab)</a>
Try Clicking These Live Links Below:⌗
Guided Activity — Adding Photos & Links to Sahil’s Page⌗
PART 1 — Project Setup⌗
- Open VS Code.
- Go to File → Open Folder and select your
Sahil_Projectfolder. - Open your existing file:
index.html. - Make sure your image files are inside the
Sahil_Projectfolder!
PART 2 — Expected Browser Output⌗
Here is what Sahil’s updated page will look like once we add his profile photo, campus image, and university link inside index.html:
PART 3 — Live Coding Challenge⌗
Together as a class, we will add:
- An
<img>profile tag withsrc,alt, andwidthright under Sahil’s header. - A clickable hyperlink
<a>taking users to UC Irvine’s website withhrefandtarget="_blank".
Independent Activity — Media & Links Portfolio Upgrade!⌗
Now it’s your turn! Open your personal portfolio page, add a personal or interest image, and add clickable links to your top favorite websites.
Instructions:⌗
- Open your
Portfoliofolder in VS Code. - Open your existing file:
portfolio_day1.html. - Upgrade your portfolio by adding images and links directly inside this file!
Your Portfolio Prompt⌗
Your updated page must include the following 4 requirements:
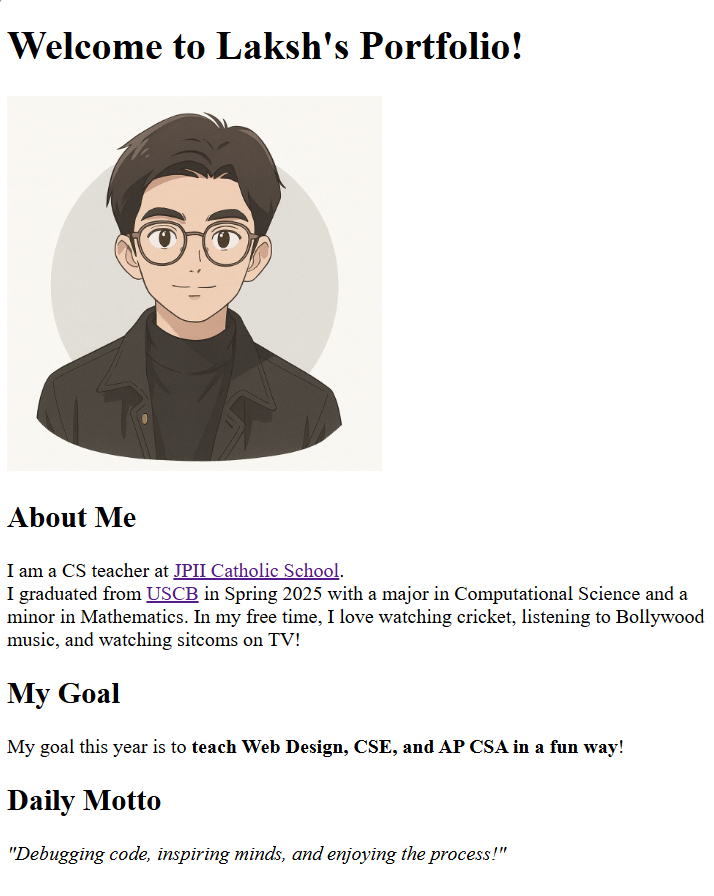
- Add an Image (
<img>): Add an image related to your interests (or a profile picture) usingsrc,alt, and set a clean size usingwidth. - Add an External Link (
<a>): Add couple of clickable links to your favorite website or school website usinghref. - Tab Control: Use
target="_blank"on your external link so it opens in a new browser tab.
Example Solution⌗
Submission Instructions⌗
Submit your work in Google Classroom under In‑Class Exercise 4 by:
- Opening your Google Doc from previous lectures.
- Pasting your updated HTML code from both
index.htmlandportfolio_day1.html. - Adding screenshots of both rendered pages showing the images and working links!
- Turning in the document!
Summary: New Concepts Learned Today⌗
| Tag / Attribute | Type | What It Does | Example |
|---|---|---|---|
<img> | Unpaired Tag | Displays an image on the webpage | <img src="pic.jpg"> |
src="..." | Attribute | Specifies the image file path | src="photo.png" |
alt="..." | Attribute | Alternative text for accessibility/broken images | alt="Description" |
width="..." | Attribute | Sets width of an element in pixels | width="300" |
height="..." | Attribute | Sets height of an element in pixels | height="200" |
<a> | Paired Tag | Creates a clickable hyperlink | <a href="...">Text</a> |
href="..." | Attribute | Specifies destination URL for a link | href="https://..." |
target="_blank" | Attribute | Opens link in a new tab | target="_blank" |
target="_self" | Attribute | Opens link in the same tab | target="_self" |