Lecture 9 — Introduction to HTML Forms & Text Inputs
Lecture 9 — Introduction to HTML Forms & Text Inputs⌗
Instructor: Laksh Budhrani
Quick Recall: Unit 1 Summary⌗
Before we learn how to collect information from visitors on our website, let’s review all the structural tags, media, links, lists, and tables we’ve mastered so far!
| Tag | Associated Attributes | Type | Purpose |
|---|---|---|---|
<h1> – <h6> | None | Paired | Headings of different sizes |
<p> | None | Paired | Text paragraph block |
<b>, <i>, <u>, <mark>, <s> | None | Paired | Basic text formatting |
<sup>, <sub> | None | Paired | Superscript and subscript text |
<!-- --> | None | Special | Hidden code notes/comments |
<hr>, <br> | None | Unpaired | Horizontal rule divider, Line break |
<img> | src, alt, width, height | Unpaired | Displays an image |
<a> | href, target (_blank / _self) | Paired | Creates clickable hyperlink |
<ul>, <ol>, <li> | None | Paired | Unordered & ordered list items |
<table>, <tr>, <th>, <td> | colspan, rowspan | Paired | Data grids and merged cells |
Class Check-In: Up until today, our websites have been “read-only”—we display text, images, and tables to visitors. Today, we learn how to let users talk back to our website!
The Story Continues…⌗

Sahil’s Week 9 Update!
Sahil has been having an incredible semester at UC Irvine! His website displays his goals, favorite activities, and daily schedule.
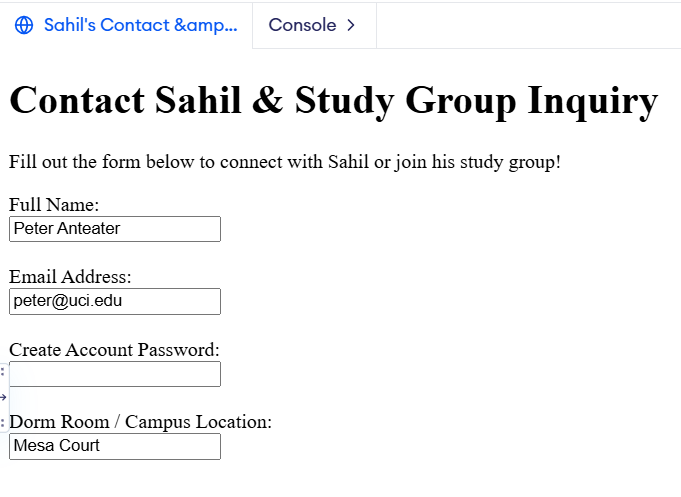
Now, Sahil wants to add a “Contact Me & Study Group Inquiry” section at the bottom of his site so campus classmates, chess club members, and dorm neighbors can send him messages, share their email addresses, and reach out to study together.
Typing standard text on a screen won’t work—he needs interactive boxes where visitors can type their own information! Sahil needs our help using HTML Forms to build a contact box inside a brand-new file:
sahil_day9.html!
Sahil’s Request for Today⌗
“Hey! I want people visiting my site to be able to type their contact info and leave me messages directly!”
“Here is what I need you to help me build in
sahil_day9.html:”
- Form Container: Set up one master form container (
<form>) to hold all our input fields.- Clear Labels: Label each box clearly so visitors know what to type.
- Single-Line Inputs: Create text boxes for the visitor’s Full Name, Email Address, and Account Password.
- Input Attributes: Understand how input fields send their information using the
nameandvalueattributes!
Objectives⌗
- Understand what an HTML Form (
<form>) is and how it collects user data. - Learn how to label input fields properly using the
<label>tag. - Master basic single-line input controls:
<input type="text">,type="email", andtype="password". - Understand how data is saved using the
nameandvalueattributes.
Objective 1 — What is an HTML Form? (<form>)⌗
The Real-World Analogy⌗
Think of an HTML Form like a Paper Clip-Board Form at a doctor’s office or a job application:
- The
<form>tag is the physical clipboard holding everything together. - The
<input>tags are the blank lines where people write down their name, phone number, or signature.
Simple Definition⌗
The <form> tag is a container wrapper that encloses all interactive controls (text boxes, buttons, checkboxes) on a webpage.
<form>
    <!-- ALL INPUT FIELDS & LABELS GO INSIDE HERE -->
</form>
Objective 2 — Labels (<label>) & Inputs (<input>)⌗
When building forms, every input field needs a clear label so the user knows what information is required.
1. The <label> Tag (Paired)⌗
The <label> tag displays text next to or above an input box to identify what that box is for.
2. The <input> Tag (Unpaired / Self-Closing)⌗
The <input> tag creates an interactive input control. It is an unpaired tag—it does not have a closing </input> tag!
<label>First Name:</label>
<input type="text">

Objective 3 — Basic Input Types (type="...") & Code Playground⌗
The type attribute changes how an <input> field looks and behaves on the screen. Today, we are mastering 3 fundamental text input types:
| Input Type | Code Example | Visual Appearance & Behavior |
|---|---|---|
text | <input type="text"> | Standard single-line text box for names, titles, or general text. |
email | <input type="email"> | Specialized text box that checks for a valid email format (e.g., [email protected]) on submission. |
password | <input type="password"> | Secure text box that hides characters behind dots (••••••) to protect sensitive user input. |
Step-by-Step Code Playground⌗
Step 1: Basic Text Field (type="text")⌗
<label>Student Name:</label>
<input type="text">

Step 2: Email Field (type="email")⌗
<label>Email Address:</label>
<input type="email">

Step 3: Masked Password Field (type="password")⌗
<label>Create Password:</label>
<input type="password">

Objective 4 — How Forms Save Data: name & value⌗
When someone fills out your form and hits submit, where does that information go?
Behind the scenes, the computer saves all responses into a simple score table (just like an Excel spreadsheet):
nameis the column title (It tells the computer what label to give this answer).valueis the text typed inside the row (It is the actual answer the student wrote!).
The Database Table Analogy⌗
Imagine Sahil writes this HTML code:
<label>Student Name:</label>
<input type="text" name="student_name" value="Peter Anteater">

<label>Email Address:</label>
<input type="email" name="user_email" value="[email protected]">
When submitted, the computer builds this simple table automatically:
student_name(from name=“student_name”) | user_email(from name=“user_email”) |
|---|---|
| Peter Anteater (value) | [email protected] (value) |
| Sahil (value) | [email protected] (value) |
Quick Summary:
name= The label for the column (so the computer knows what box it is).value= What is typed inside the box! If you writevalue="..."in your HTML, it pre-fills default text into the box for the user.
Guided Activity — Building Sahil’s Contact Form⌗
PART 1 — Project Setup⌗
- Open VS Code.
- Go to File → Open Folder and select your
Sahil_Projectfolder. - Create a new file named:
sahil_day9.html.
PART 2 — Expected Browser Output⌗
Here is what Sahil’s completed contact form will look like once we write the HTML together:
PART 3 — Starter Code (We will write the content together live!)⌗
Paste this starter boilerplate into sahil_day9.html. We will fill in the <body> together in class!
<!DOCTYPE html>
<html>

<head>
    <title>Sahil's Contact & Study Inquiry</title>
</head>

<body>
	<!-- START WRITING HERE -->


	<!-- STOP WRITING HERE -->
</body>

</html>
Independent Activity — My Portfolio Contact Form!⌗
Now it’s your turn! Add a brand-new contact page to your portfolio so visitors, classmates, or future employers can reach out to you.
Instructions:⌗
- Open your
Portfoliofolder in VS Code. - Create a new file named
portfolio_day9.html. - Copy the starter template above into your file and build your page using
<form>,<label>, and<input>tags.
Your Portfolio Prompt⌗
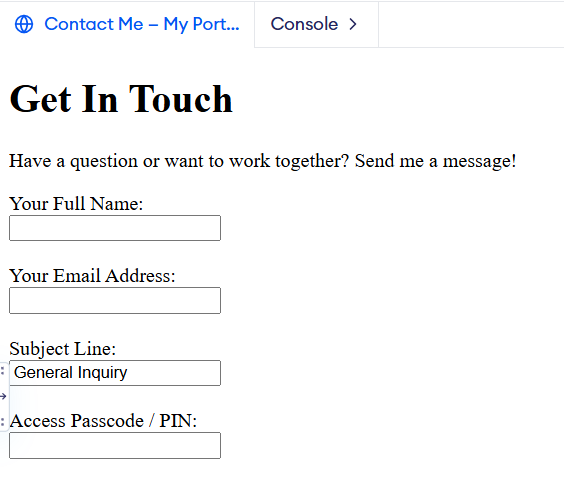
Your page must include the following 4 requirements:
- Form Setup: Set up 1 main
<form>container with a descriptive<h1>title above it. - Text Input (
type="text"): Create a field for the visitor’s Full Name using<label>and a clearnameattribute. - Email Input (
type="email"): Create a field for the visitor’s Email Address usingtype="email"andname="user_email". - Password or Subject Field: Create a third input field for either a secret PIN/Password (
type="password") or Subject Line (type="text") using proper labels,name, and an optional defaultvalue.
Example Solution⌗
Submission Instructions⌗
Submit your work in Google Classroom under In‑Class Exercise 9 by:
- Opening your Google Doc from previous lectures.
- Pasting your HTML code from both
sahil_day9.htmlandportfolio_day9.html. - Adding screenshots of both rendered pages from your browser.
- Turning in the document!
Summary: New Tags & Attributes Learned Today⌗
| Tag / Attribute | Type | Purpose | Example |
|---|---|---|---|
<form> | Paired Tag | Main wrapper container for form controls | <form>...</form> |
<label> | Paired Tag | Displays text labeling a specific input field | <label>Name:</label> |
<input> | Unpaired Tag | Creates an interactive input field | <input type="text"> |
type="text" | Attribute Value | Creates a standard single-line text box | type="text" |
type="email" | Attribute Value | Creates an input box tuned for email addresses | type="email" |
type="password" | Attribute Value | Creates a masked text box that hides typed characters | type="password" |
name="..." | Attribute | Column header/label for saving field data | name="user_name" |
value="..." | Attribute | Text stored or pre-filled inside the box | value="Peter" |